We use cookies to offer you a more personalized and smoother experience. By visiting this website, you agree to our use of cookies. If you prefer not to accept cookies or require more information, please visit our Privacy Policy.
Question: My hard drive is 160 GB, when I install Windows 2000 or Windows XP, I can only see 137 GB. However, when I install this 160 GB hard drive on the ATA 133 RAID card, I can use whole 160 GB. What's wrong?(5/15/2004) Answer: If you would like to use whole 160 GB as only one partition while installing the Windows OS, please make sure that your OS is Windows 2000 service pack 4 included or Windows XP service pack 1 included.
When you install the hard drive on the RAID card, you would need to press F6 to install third party driver during the Windows installation, and the driver is the reason why you can use whole 160 GB even your Windows XP service pack 1 is not included.
Question: My motherboard is P4VM800/ 775VM800/ P4V88+/ 775V88+/ P4Dual-880Pro/ 775Dual-880Pro/ K8Upgrade-VM800. I used it with SATA hard drive with RAID condition under Windows XP. If I log on with a limited user account, the system will show an error (see below picture), what should I do? (8/24/2005) Answer: Please refer to our download site to download the latest VIA RAID driver. This new released driver can solve this problem.
P4VM800: https://www.asrock.com/support/download.asp?Model=P4VM800
775VM800: https://www.asrock.com/support/download.asp?Model=775VM800
P4V88+: https://www.asrock.com/support/download.asp?Model=P4V88%2b
775V88+: https://www.asrock.com/support/download.asp?Model=775V88%2b
P4Dual-880Pro: https://www.asrock.com/support/download.asp?Model=P4Dual-880Pro
775Dual-880Pro: https://www.asrock.com/support/download.asp?Model=775Dual-880Pro
K8Upgrade-VM800: https://www.asrock.com/support/download.asp?Model=K8Upgrade-VM800
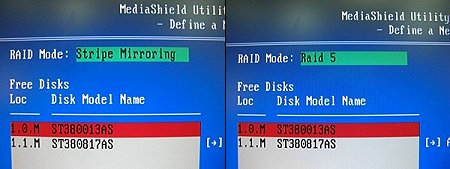
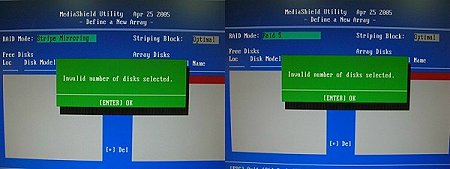
Question: I would like to use RAID functions with K8NF4G-SATA2 motherboard. When I adjust the "RAID Mode" option as "Stripe Mirroring" or "RAID 5" (picture A, B) in MediaShield Utility, the system appeared an error message "Invalid number of disks selected" (picture C, D). Why?
picture A, B.
picture C, D. (10/17/2005) Answer: K8NF4G-SATA2 supports RAID 0 (Striping), RAID 1 (Mirroring) and JBOD (Spanning) RAID modes, but it does not support RAID 0+1 (Stripe Mirroring) and RAID 5 modes. When you adjust the "RAID Mode" option as "Stripe Mirroring" or "RAID 5" mode in MediaShield Utility, the system will show a message "Invalid number of disks selected" to remind you that the system does not support "Stripe Mirroring" and "RAID 5" modes.
So please do not choose "Stripe Mirroring" and "RAID 5" modes on K8NF4G-SATA2.
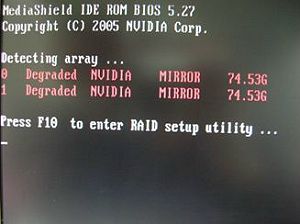
Question: I use two SATA HDDs to create RAID 1 (mirroring) array on K8NF4G-SATA2. After I finish setting up the array and OS installation, I remove one of the two SATA HDDs. However, when I put the SATA HDD back, it shows a warning message as below when booting up the system. What should I do? (1/16/2006) Answer: When you remove one of the two SATA HDDs, the system will recognize the left one as an abnormal array. Then, when you put a HDD back, the system will recognize the two HDDs as two abnormal arrays. That is why it shows a warning message to remind you that is not a normal RAID 1 (mirroring) array.
In order to solve it, please press "F10" during POST to get into MediaShield Utility and do the following steps to rebuild the array.
Step 1: Please go to the MediaShield Utility (Press F10) and choose one of the SATA HDD (array) in "Array list".
Step 2: Press "Enter" to get into the "Array Detail"
Step 3: Press "D" to delete this array.
Step 4: After you delete it, please go to "Array Detail" of the left Array.
Step 5: Press "R" (Rebuild) to get into "Select From Free Disk List"
Question: How do I use 4 SATA HDDs to build system in RAID0 mode on K8SLI-eSATA2, 939SLI-eSATA2 and 939SLI32-eSATA2?(5/24/2006) Answer: If you want to build a system in RAID 0 mode with 4 SATA HDDs, please follow below steps:
1.Enter the BIOS and set "SATA Operation Mode" to RAID mode.
BIOS -> Advance -> IDE Configuration -> SATA Operation Mode -> RAID
2.Set "eSATAII Support" to Disable.
BIOS -> Advance -> IDE Configuration -> eSATAII Support -> Disable
3.Press "F10" to save and exit.
4.When you boot up system, press "CTRL+ A" to go into ULI RAID Utility screen, and choose "Create RAID 0 Stripe X4 for Performance" option to build a RAID system with 4 SATA HDDs.
You could refer BIOS SETUP UTILITY of user manual to adjust BIOS setting.
K8SLI-eSATA2 user manual page 42.
https://download.asrock.com/Manual/K8SLI-eSATA2.pdf
939SLI-eSATA2 user manual page 43.
https://download.asrock.com/Manual/939SLI-eSATA2.pdf
939SLI32-eSATA2 user manual page 41.
https://download.asrock.com/Manual/939SLI32-eSATA2.pdf
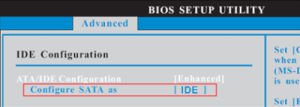
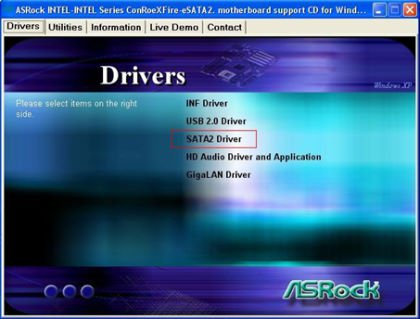
Question: I am using the ConRoeXFire-eSATA2/ 775XFire-eSATA2+/ 775XFire-eSATA2/ 775XFire-VSTA/ 775XFire-RAID motherboard. My Operating system was installed in a SATA/ SATA2 HDD with "IDE" mode. When I install the SATA2 driver (Intel® Matrix Storage Manager), system always pops an error message "This computer does not meet the minimum requirements for installing this software". Why?
IDE mode (In BIOS setup):
SATA2 driver:
Error Message: (2/15/2007) Answer: The Intel® Matrix Storage Manager (SATA2 driver) is for RAID or AHCI mode. If your operating system was built by "IDE" mode, you don't need to install it.
Question: When I create a RAID volume over 2TB capacity, the RAID volume cannot be recognized after installing the RAID driver during XP installation. Why?(1/12/2009) Answer: Due to the operating system limitation, Windows® XP only supports MBR disk format, the MBR disk format cannot support the hard drive capacity over 2TB.
If you want to use over 2TB RAID volume to be your boot disk, below three conditions must be required:
1.Your operating system must be Windows® Vista™ x64 SP1 or Windows® 7 64bit.
2.EFI BIOS.
3.GPT disk format.
Please refer to following link to get more information.
Link:
http://support.microsoft.com/?scid=kb;en-us;946557&x=9&y=7
http://www.microsoft.com/whdc/device/storage/GPT_FAQ.mspx
Step2:
Please unzip the SATA RAID driver which downloaded in Step1 and put the SATA RAID driver in USB flash drive.
Step3:
Please click "Load Driver" when selecting hard drive in Windows installation.
Step4:
Click "Browse"
Step5:
Choose the folder downloaded in Step1.
RSTe_f6_iaStorA_2008R2_32 is used for 32-bit operating system.
RSTe_f6_iaStorA_2008R2_64 is used for 64-bit operating system
Step6:
Select the SATA RAID driver for "Intel(R) C600 Series …." as below picture and click next to install the OS.
Question: When I set SATA as RAID or AHCI mode, I can not view S.M.A.R.T values with some utility like AIAX64 or CrystalDiskInfo, why?(5/1/2012) Answer: Please enter Intel Rapid Storage Technology to check S.M.A.R.T values under RAID or AHCI mode.
Because of S.M.A.R.T. values are reported as S.M.A.R.T. alerts by the Intel Rapid Storage Technology user interface and tray icon.
For detail, please refer Intel official website: http://www.intel.com/support/chipsets/imsm/sb/cs-015002.htm
Question: How to install OS on over 2.2TB RAID volume on ASRock 970/990FX motherboard?(5/1/2012) Answer: Please follow below SOP to install Windows Vista/7 64bit OS on the RAID volume:
Step 1: Flash BIOS to latest version.
Step 2: Connect all HDDs then do below settings:
Set [SATA Mode] as [RAID Mode]
Change [Onboard RAID 3TB+ Unlocker] to [EFI Compatible ROM]
The options are located in BIOS > [Advanced] > [Storage Configuration]
Then press F10 to save settings.
Step 3: Press F11 during boot up and choose boot to [Built-in EFI Shell].
Step 4: Key in "drvcfg", and you will see the information like below:
Drv[4E] Ctrl[B5] Lang[eng]
Step 5: Key in "dh [Drv number]", for example: key in "dh 4E".
Step 6: Key in "drvcfg –s [Drv number] [Ctrl number]" to enter Raid Utility.
For example: key in "drvcfg –s 4E B5"
Step 7: Choose [Logical Drive Main Menu] to set up Raid Drive.
Step 8: Choose [Logical Drive Create Menu] to create a Raid Drive.
Step 9: Choose [Usable Physical Drive List] to select Raid HDD.
Step 10: Press Space on keyboard to toggle checkbox.
Step11: Choose [Ld Size setting], and key in the Raid size.
Step12: After set up Raid size, please click [Start to Create]
Step13: Press "F10" to Exit Utility.
Step14: During reboot, please press "F11" to enter Boot Menu.
Choose UEFI: CD/DVD Drive
* This option only shows on Windows7 64bit and Vista 64bit OS.
Step 15: Follow Windows Installation Guide to install OS.
Please load latest SATA RAID driver ver.3.3.1540.22 during OS installation from our website
Step 16: Install latest drivers from ASRock website.
Question: I can not enter LSI MegaRaid 9240-8i RAID ROM with ASRock X79 platform, how could I do?(8/1/2012) Answer: Please disable all bootable devices under BIOS, then save and leave.
When system boot up, please press to enter LSI RAID ROM.
After setup finish, in order to restore bootable devices, please enter BIOS again and load BIOS default.
Question: I want to use TRIM function for RAID. Which system supports TRIM for RAID 0?(11/1/2012) Answer: According to Intel documents, for a system to support Trim for RAID 0 it must meet the following conditions.
1. Please check whether your SSD supports TRIM function.
2. Intel 7-Series Express Chipset-based motherboard.
3. Windows 7 (Windows 8 will support Trim for RAID 0 in the future)
4. RAID 0 volume combined by SSD drives.
5. Intel Rapid Storage Technology software 11.0 version or later.
6. Intel SSD Toolbox 3.1.1 version or later.
Question: How can I remap M2_3 slot and other M.2 slots to configure a PCIE SSD RAID on Z490 Taichi?(6/1/2020) Answer: Please make sure to use identical PCIE SSDs that are the same type and volume.
Follow the steps below to adjust the BIOS settings to configure the PCIe RAID.
STEP 1. Enter the UEFI Setup Utility by pressing or < Del > hotkey during the post screen.
STEP 2. Go to Advanced -> Storage Configuration and set SATA Mode Selection to [RAID Mode].
STEP 3. Go to Boot -> CSM and set Launch Storage OpROM policy to [UEFI only].
STEP 4. Adjust the M.2 slots - RST PCie Storage Remapping that you've installed PCIE SSDs to [Enabled]. Press to save the settings and exit setup.
STEP 5. Go to Advanced -> USB Configuration and set Third Party USB 3.2 Controller to [Disabled]. Press to save the configuration changes and exit setup. Caution: After disabling the Third Party USB3.2 Controller, the onboard Type-C port will be turned off.
STEP 6. Enter Intel(R) Rapid Storage Technology in Advanced page.
STEP 7. Select the option Create RAID Volume and press .
STEP 8. Key-in a volume name and press , or simply press to accept the default name.
STEP 9. Select your desired RAID Level and press .
STEP 10. Select the target hard drives which you want to build in RAID array and press .
STEP 11. Select a stripe size for the RAID array and press .
STEP 12. Select Create Volume and press to start creating the RAID array.
Question: How to check the RAID configuration via the Intel RST application under Windows 11?(12/15/2021) Answer: Please refer to the following steps to check the RAID configuration.
Step 1: Obtain the Intel(R) RST driver installation package and run the executable (SetupRST.exe).
*RST driver can be obtained via the download section of the product page on the ASRock website.
*Default settings and name of the driver may vary and is subject to change without notice.
Step 2: Install using the default setting and reboot the computer.
Step 3: From Windows desktop, find and launch the Intel® Optane(TM) Memory and Storage Management application.