We use cookies to offer you a more personalized and smoother experience. By visiting this website, you agree to our use of cookies. If you prefer not to accept cookies or require more information, please visit our Privacy Policy.
Question: How do I configure Realtek 5.1ch audio output on N100M under Windows 10?(10/29/2024) Answer: Please follow the steps below.
1. Go to BIOS\Chipset Configuration and set Intel SST to "Enabled”.
2. Boot into Windows. Download and install Realtek high definition audio driver version:6.0.9503.1_RTK_SST and follow the instructions, restarting the system after the installation.
Realtek high definition audio driver ver:6.0.9503.1_RTK_SST:
Question: The integrated speakers of my monitor provide no audio output. What can I do?(8/9/2022) Answer: Please try the followings:
1. Make sure the monitor cable (HDMI/DisplayPort) is properly connected to both the monitor and the output on the graphics card, motherboard or notebook.
2. Install the latest graphics driver for your graphics card or for the integrated graphics of your CPU and test.
3. In the OS, check which audio device is set as default output device. Check all the volume settings as well in the OS and on the monitor.
4. If possible, please test the monitor audio with another motherboard or notebook.
Question: I have a TRX40 motherboard. Under the device manager, there is a RTK Boot device showing with an exclamation mark and there is no sound output from the audio port. What can I do to fix it?(4/1/2020) Answer: If there is a RTK device showing under the device manager and audio port cannot be used, please follow the steps below to remove the RTK device and allow the audio to work properly.
Step 5. Double click the UacCodecDownload_AllInOne_RsProxy_2.64.10
Step 6. Press the Start button to start flashing the audio firmware.
Step 7. Once the flashing process is completed, the tool will show Pass which means audio firmware has successfully flashed and there should not be RTK boot device showing under the device manager.
Question: When I record via the Microphone in Windows 10 1909, there are hissing noises from the recordings.(1/1/2020) Answer: If hissing noise is heard from recordings, please choose one of the methods below to avoid hissing noise.
Method 1:
Step 1.
Download the Realtek high definition audio driver from the ASRock website.
*Please make sure your LAN cable is connected when installing the Realtek audio driver.
Step2:
Open the "Realtek audio console”.
Step 3.
Turn on the "Noise suppression reduces ambient stationary noises” option in the Realtek audio console APP.
Step 4.
Once the setting above is enabled, recording quality will be improved.
Method 2:
Step 1.
Refer to step 1 and step 2 of method 1 to open the "Realtek audio console”.
Step 2.
Adjust Microphone Boost to +0db.
Step 3.
Once the boost value is adjusted to +0db, recording quality will be improved.
Question: How to install Realtek Audio Console APP under Windows 10 RS4 or later version?(10/1/2018) Answer: In general, the system will auto-download the APP in background after installing Realtek Audio driver.
Please type "Realtek Audio Console” in Win10 search bar to access APP.
*Please connect the LAN cable when installing the Realtek Audio driver.
If the APP doesn't show up on your system, please follow the steps below to install it manually.
1.Go to the device manager to check if the Reaktek Audio driver is installed.
* Realtek Audio driver could be installed / downloaded from support CD and ASRock official website: www.ASRock.com.
2. Please make sure that Windows updates are at latest.
Settings > Update & Security > Windows Update and select Check for updates
3.Please refer to the following link to access "Realtek Audio Control” on Microsoft Store and click "Get” to start downloading. https://www.microsoft.com/store/productId/9P2B8MCSVPLN
4.After installation, click Launch to launch the APP.
Question: How do I install Sound Blaster Connect APP under Windows 10 RS4 or later version?(10/1/2018) Answer: In general, the system will auto-download the APP in background after installing Realtek Audio driver. Please type "Sound Blaster Connect” in Win10 search bar to access APP.
If the APP doesn't show up on your system, please follow the steps below to install it manually.
1.Make sure your motherboard supports Creative Sound and with Realtek Audio driver installed.
* Please visit motherboard specification page on www.ASRock.com for details.
* Realtek Audio driver could be installed/downloaded from support CD and ASRock official website.
2.Access "Sound Blaster Connect” on Microsoft Store and click "Get” to start downloading. https://www.microsoft.com/en-sg/store/p/sound-blaster-connect/9n66rljrt8z2
3.After installation, click Launch to launch the APP.
Please refer to the following table which supports the Creative SoundBlaster Cinema5.
Question: When I play music or movies with Media Player under Win8 32/64bit, Media Player stops and shows an error message whenever I plug a headphone into the front audio panel. How do I fix this?(9/1/2013) Answer: Please re-open Media Player and play the file again to have sound come out from the front headphone.
Question: Can my DVI port transfer audio signals like HDMI? How to make it work with my HDMI monitor?(2/1/2013) Answer: Please make sure that you meet the required conditions listed below.
1. The DVI port on the motherboard must support HDCP.
If you aren't sure about the DVI port's specifications, please refer to the specification for your M/B on our website.
2. Connect a DVI to HDMI adapter.
3. Adjust the DVI function option to [as HDMI] in BIOS\Advanced\North Bridge Configuration.
4. Set HDMI as default playback device in Control Panel\Sound.
Question: How could I enable Dual-link DVI on AMD 880G, 890GX chipset series motherboards?(3/1/2012) Answer: Please set [Onboard HDMI HD Audio] option to [Disabled] in BIOS.
Route: BIOS-> Advanced-> North Bridge Configuration-> Disabled [Onboard HDMI HD Audio] option.
Question: How do I setup digital sound (DTS5.1, Dolby5.1, DTS HD Master and Dolby True HD) output via HDMI or SPDIF?(11/1/2011) Answer: Requirements:
OS: Windows7, Vista SP2 or later.
Receiver / decoder: Onkyo TX-SR608 amplifier for example:
Playback software: for example Power DVD10 v10.0.2025.52 or other playback software.
Setup:
1. Please install all drivers from support CD, after that please check device manager, there should be no any "!" or "?" on list.
2. Please enter Control Panel > Hardware and Sound > Sound,
If you would like to output via HDMI, please select [HDMI output]
If you would like to output via SPDI, please select [Digital output]
*Different motherboard/chipset may show different information, above picture is for references only.
3. Enter the Audio settings in your application.
We take Power DVD 10 here for example: Choose the Speaker environment and Output modes as you want.
4. Set your decoder/amplifier to the digital sound output, which you want.
5. Set the correct output format on your content /source manual.
Question: I connect Vision 3D with TV via HDMI cable, but cannot hear any audio playback after system resume from suspends. What do I do?(1/14/2011) Answer: Please download and install new VGA driver 266.35 from following link.
Link: https://www.asrock.com/nettop/overview.asp?Model=Vision%203D%20Series
Question: If I use AC'97 front audio panel with VIA® audio codec motherboard, how do I connect AC'97 front panel to HD Audio header on the motherboard?(2/10/2010) Answer: If you use AC'97 front audio panel, please install it to the HD audio header as below:
A. Connect Mic_IN (MIC) to MIC2_L.
B. Connect Audio_R (RIN) to OUT2_R and Audio_L (LIN) to OUT2_L.
C. Connect Ground (GND) to Ground (GND).
D. MIC_RET and OUT_RET are for HD audio panel only. You don't need to connect them for AC'97 audio panel.
E. Enter BIOS Setup Utility. Enter Advanced Settings, and then select
Chipset Configuration. Set the Front Panel Control option from [Auto] to [Enabled]. For Windows® XP
F. Enter Windows® system. Click the icon on the lower right hand taskbar to enter VIA® ADeck. Click "Mixer", select "Front Microphones", choose "Front Mic Boost", and leave.
Like below picture:
H. If you want to hear your voice through Front Mic, Please click "Mixer", select "Play Back", choose "Front Mic", and leave.
Like below picture: For Windows® Vista™ / Windows® 7
F. Enter BIOS "Chipset Settings" page, manual [Front Panel] to [Enable].
G. Enter Windows® system. Click the icon on the lower right hand taskbar to enter VIA® VDeck. Click "Front Mic", select "Default Device"
H. If you want to hear your voice through Front Mic, Please click "Speaker Output" icon.
Like below picture:
Question: Why I cannot hear audio playback under Windows® XP when I connect HDMI cable with ION330?(9/3/2009) Answer: Some suggestions as below may solve the issue,
1. Please re-install your Windows® XP and install required driver in such order :
a. HD Audio Driver and Application(VIA® HD Audio driver)
b. Onboard HDMI HD driver (NVIDIA® HDMI driver)
c. All in 1 driver.
2. Refering to the attached picture, please install a display driver in support CD -> Others -> Display -> XP32_185.66 -> Setup.exe
3. Please check your VGA driver version has been update to 6.14.11.8576 by device management.
4. Since when ever you plugged the rear speaker to ION330, the sound playback would AUTOMATICALLY set to "HD Audio Rear Output", therefore, during the test, please ONLY connect HDMI to the TV, and make sure the sound playback is set to "NVIDIA® HD Audio"
Question: ION330 support Dolby Digital 5.1 or DTS 5.1?(9/3/2009) Answer: ION330 can support Dolby Digital 5.1, DTS 5.1 and LPCM 7.1 only under Windows® Vista™ or later version.
Please refer to below steps to setting your system.
1. Please update the HOTFIX: KB959458 or update your Vista Service Package to SP2.
Hotfix download link: http://support.microsoft.com/kb/959458
2. Install the drivers in the order listed as below
a. VIA® HD Audio Driver 7100d
b. NVIDIA® HD Audio driver 1.0.0.51
c. NVIDIA® nForce All in 1 v20.14
3. Install a proper AP, we used PowerDVD 9.0 for tests here.
4. Enter Control Panel -> Sound -> Configure to choose Stereo, 5.1.
5. Enter Control Panel -> Sound -> Properties to set the sampling rate, Max Fs. for Dolby-Digital DTS is 48 KHz.
6. RIGHT CLICK in PowerDVD -> Settings -> Audio
a. Speaker Environment -> Use HDMI (Current Vista Setting)
b. Output Mode -> Non-Decoded DD/DTS to external device.
7. RIGHT CLICK in PowerDVD -> Settings -> Video. Enable Hardware Acceleration
8. As you can see in the picture below, the audio output is Dolby Digital 5.1.
*If you want to output DTS 5.1, please select it in audio menu of DVD.
*For your information, the source of the test is a DVD which supports both DD5.1 and DTS 5.1.
Question: I install ATI 2xxx, 3xxx, 4xxx series PCIE VGA card on the motherboard. After installing all Windows® XP drivers from the motherboard, it still shows an unknown "audio device on the high definition audio bus." message under device manager. What could I try?(1/12/2009) Answer: There is an integrated audio chip in the ATI 2xxx, 3xxx, 4xxxx series graphics cards.
Please install ATI HDMI audio driver.
http://ati.amd.com/support/drivers/xp/hdmiaudio-xp.html
Question: I have a motherboard with Realtek HD Audio Codec. When I use Windows® XP SP3 or upgrade to Windows® XP SP3, the onboard audio doesn't work. What could I try?(11/27/2008) Answer: Please try the Realtek latest audio driver.
The driver is available from this link: http://www.realtek.com.tw/downloads/downloadsView.aspx?Langid=1&PNid=14&PFid=24&Level=4&Conn=3&DownTypeID=3&GetDown=false
Question: I am a 939Dual-VSTA user. At first, my onboard audio works fine with integrated audio driver under Vista™. After updating to Vista service pack 1, my onboard audio does not work anymore. Can you help me?(9/5/2008) Answer: Please update the C-Media audio driver 8.18.07_SPDIF to fix the problem. The audio driver is available at https://www.asrock.com/mb/download.asp?Model=ALiveDual-eSATA2&s=AM2
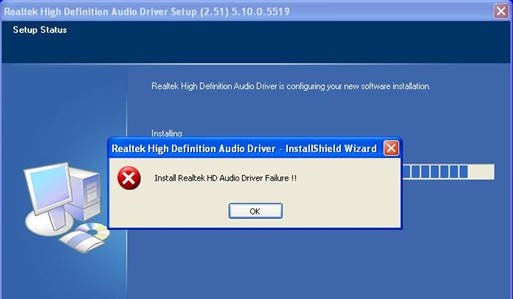
Question: When I install Realtek HD Audio driver, I found the system shows below error message. What can I do? (6/26/2008) Answer: Please refer to below steps to reinstall Realtek HD Audio driver:
1.Enter into "Add or Remove Programs" and remove "Realtek High Definition Audio Driver"
2.Disable all "Microsoft® UAA Bus Driver for High Definition Audio" in Device Manager first
3.Then uninstall all "Microsoft® UAA Bus Driver for High Definition Audio" from the system.
4.Reboot system
5.Reinstall "Realtek HD Audio driver" from Motherboard Support CD.
If you still meet this problem, please reinstall fresh Windows® system.
Question: My motherboard with Realtek ALC662 audio codec supports 5.1 channel HD Audio. But it has 3 audio connectors (Light blue, Lime and Pink) on the rear audio panel. How do I connect my 5.1 channel speakers to the rear audio panel?(3/24/2008) Answer: Please refer to following steps to connect your 5.1 channel speakers:
1. Connect the "Rear Speaker" to Line In (Light blue) port
2. Connect the "Front Speaker" to Line Out (Lime) port
3. Connect the "Central / Subwoofer" to Microphone (Pink) port
4. Adjust the "Audio I/O" setting to "6CH Speaker" in REALTEK Audio Management. Please refer to the following picture:
Question: After installing ATI HDMI audio driver for my ATI HD 2xxx series PCIE card, I found the onboard sound will not work. How do I fix the problem?(9/10/2007) Answer: Please kindly refer to below steps to check your system setting.
1.Please double check the onboard sound is working properly in Device Manager.
(If not, please reinstall Realtek HD Audio driver from Support CD.)
2.Enter the Sound setting in the Control Panel.
3.If the Default device of the Sound playback is "ATI HD Audio rear output", please change it to "Realtek HD Audio output".
4.Press "OK" to save setting.
Question: I am using a 4 / 6 / 7.1 channels speaker on AM2NF3-VSTA. Why do only 2 channels work under Windows® Vista™?(8/3/2007) Answer: 1. Please install Vista audio driver. The driver is available from ASRock Web Site.
https://www.asrock.com/mb/download.asp?Model=AM2NF3-VSTA
2. To have the 4/ 6/ 8 channels speaker work normally, it needs to do some settings in Windows® Vista™. Please refer to following steps.
(1)Please double click the "CM6501 Sound Configuration" icon at the Taskbar.
(2)Set the System Input as "2 CH".
(3)Set the Analog Output as corresponding channels that you have.
(4)Click ok.
Question: ALiveNF7G-HD720P/ALiveNF7G-HDready support HDMI output?(6/25/2007) Answer: Yes, ALiveNF7G-HD720P/ALiveNF7G-HDready supports HDMI output.
However, a DVI to HDMI cable or adapter is required.
DVI to HDMI cable
DVI to HDMI Connector
Besides the DVI to HDMI cable/adapter, please also do the following settings in BIOS SETUP and Windows® Vista™/Vista 64-bit:
1.In BIOS SETUP, go to "Advanced"->"Chipset Configuration", and set the option "Onboard HDMI HD Audio" to [Auto].
2.Under Windows® Vista™/Vista 64-bit, go to "Sound" settings and select the Digital Output Device (SPDIF) as a playback device.
You can find more detail information in user manual page 13:
Question: I have a motherboard with Realtek HD audio codec. After resume Windows® Vista™ from sleep or from hibernation, the high definition audio device may no longer work. How do I solve this?(4/25/2007) Answer: This is caused by Microsoft. It can be solved by installing the Microsoft® Hot fix. Please refer to the Microsoft® Knowledge Base: http://support.microsoft.com/kb/929685/en-us
Question: I have a motherboard with Realtek HD audio codec. After installing the Microsoft® Security Update 925902 and 928843, my system shows the following error message. How do I fix this? (4/20/2007) Answer: This is caused by Microsoft. It can be solved by installing the Microsoft® Hot fix. Please refer to the Microsoft® Knowledge Base: http://support.microsoft.com/kb/935448/
Question: My onboard audio is Realtek HD audio. In the Windows® Vista™, I can't use Sound Recorder to record the audio. What should I do?(3/19/2007) Answer: Please refer to below steps to set the audio device.
1.Install Realtek HD Audio driver from motherboard Support CD. Or download the Realtek HD audio driver from ASRock website.
https://www.asrock.com/support/Download.asp
2.Plug in your recording devices (Microphone or other devices) to the Line-in port (or Microphone port), and then the recording device will show up "Line In" (or "Microphone") icon. Please kindly refer to below image. (Control Panel > Sound > Recording)
*Before plug in the recording devices:
*After plug in the recording devices:
Question: How do I enable Windows® Aero feature in my Windows® Vista™ Premium system?(2/15/2007) Answer: First, your hardware must meet the requirements of the Windows® Vista™ Premium system. If not, you may not enable Windows® Aero.
Windows® Vista™ Premium system - Hardware Minimum Requirements
Item
Requirements
CPU
x86-compatible 32-bit CPU or x64-compatible 64-bit CPU
Memory
512MB Single Channel (Premium, Discrete models) 512MB x 2 Dual Channel (Premium, embedded models)
VGA
DirectX9.0 (with WDDM Driver) with 128bit VGA memory (Premium)
Audio
UAA Audio (HD Audio, USB Audio and IEEE1394 Audio) (Premium or Basic depends on Codec Vista logo level)
Second, please kindly refer to below steps to enable Windows® Aero feature:
1.Press right button of mouse at Desktop and click "Personalize".
2.Enter into "Windows® Color and Appearance" setting
3.Refer to below image to enter "Open classic appearance properties for more color options" setting.
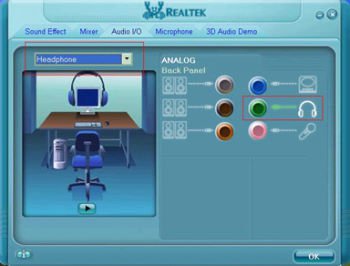
Question: I plugged a headphone in my ASRock motherboard with Realtek HD Audio, and set the "Audio I/O" from "2CH" to "Headphone" in Realtek Audio Manager (picture1).
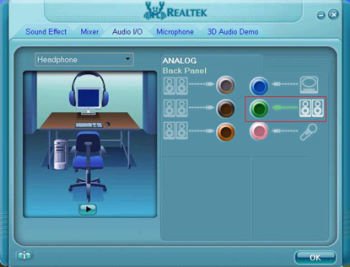
But the Realtek Audio Manager always recognized my headphone as 2CH speaker after I restarted the operating system (picture2).
What should I do?(1/16/2007) Answer: Please refer to the following steps to set up the Realtek Audio Manager correctly.
1.Please remove all audio I/O (Headphones, Speakers, Microphone...) from the motherboard.
2.Please go to Realtek Audio Manager and set the "Audio I/O" you want.
3.Click ok.
4.Please plug your audio I/O back.
5.Restart your system.
Question: My system is based on 775Dual-VSTA / ALiveSATA2-GLAN / AM2V890-VSTA with Windows® XP / Windows® 2000 operating system. After updating to the latest BIOS, I found two issues.
1.I can't find the "HD Audio Driver and Application" link in the menu of support CD.
2.There is a yellow exclamation mark in Device Manager.
What could I do?(9/19/2006) Answer: 1.If your CD is IVD12/ IVD12b (775Dual-VSTA), AV890-10 (ALiveSATA2-GLAN) or AV31/ AV31b (AM2V890-VSTA), you will get the issue.
Please execute the "Setup.exe" file from following directory of support CD.
775Dual-VISTA-> IVD12
CD\Drivers\Audio\REALTEK\MCE_XP_2K (R1.36)\
775Dual-VISTA->IVD12b
CD\Drivers\Audio/ REALTEK\MCE_XP_2K (R1.41)\
ALiveSATA2-GLAN -> AV890-10
CD\Drivers\Audio\REALTEK\MCE_XP_2K (R1.39)\
AM2V890-VSTA -> AV31/ AV31b
CD\Drivers\Audio\REALTEK\MCE_XP_2K (R1.39)\
2:The yellow exclamation mark in Device Manager is unnecessary. It will not affect the system at all. Please follow below steps to remove it.
Right-click "My Computer" on your desktop, and click "Properties".
Select "Hardware", and click "Device Manager".
In "Device Manager", double-click the option "System Devices". You will find "VIA® Standard PCI to PCIE Bridge" item with a yellow exclamation mark.
Right-click "VIA® Standard PCI to PCIE Bridge", and select "Uninstall". Confirm your choice by clicking "OK".
After a few seconds, click "Scan for hardware changes" icon on the top.
Question: My onboard audio is AC'97 audio. The front panel audio connector cables of my case are different from the description of manual. How should I connect them? Please advice.(4/21/2006) Answer: The wording on the front panel connector cables may be different by each chassis manufacturer. Please check the function of each cable. Otherwise it may damage the board if cables are connected to the wrong connectors. We found that if you connect the "GND" (Ground) or "USB VCC" (USB Power) connector pins to the "+5V" pin, it will damage the motherboard after booting up the system. So we recommend you must not install any connector on the +5V pin of the Front Panel Audio header. It will not affect the Audio function if you remove the connector from the +5V pin.
For this reason, we will remove the +5V pin from the Front Panel Audio header of our products in the future.
There are three examples for your reference, please refer to the following pictures.
Question: If I use AC'97 front audio panel with, how do I connect to the High Definition Audio header on the motherboard and get front audio work?(2/17/2006) Answer: If you use AC'97 audio panel, please install it to the front panel audio header as below:
A. Connect Mic_IN (MIC) to MIC2_L.
B. Connect Audio_R (RIN) to OUT2_R and Audio_L (LIN) to OUT2_L.
C. Connect Ground (GND) to Ground (GND).
D. MIC_RET and OUT_RET are for HD audio panel only. You don't need to connect them for AC'97 audio panel.
E. Enter BIOS Setup Utility. Enter Advanced Settings, and then select Chipset Configuration. Set the Front Panel Control option from [Auto] to [Enabled]. For Windows® XP
F. Enter Windows® system. Click the icon on the lower right hand taskbar to enter Realtek HD Audio Manager. Click "Audio I/O", select "Connector Settings", choose "Disable front panel jack detection", and save the change by clicking "OK". For Windows® Vista™
F. Enter Windows® system, 1: Double click the icon on the lower right hand taskbar to enter Realtek HD Audio Manager. 2: Click the "Folder" icon at the top-right corner. 3. Check "Disable front panel jack detection". 4. Click "OK".
(Please refer to the following picture)
G. To activate the front mic: For Windows® XP:
Please select the Front Mic as default record device in No. 1.
If you want to hear your voice through Front Mic, please deselect "Mute" in No. 2 For Windows® Vista™:
1.Go to the "FrontMic" Tab in the Realtek Control panel.
Click "Set Default Device" to make the Front Mic as the default record device.
Question: What's the requirement for High Definition Audio to work under Windows® XP 64bit?(2/17/2006) Answer: For normal working of High Definition Audio under Windows® XP 64bit, there is a hotfix file provided by Microsoft. Please install the hotfix before installing the audio driver. Otherwise, the audio driver may not be installed successfully.
Please click the link to download the hotfix file:
http://support.microsoft.com/?kbid=901105
Question: I want to install onboard audio driver on my P4i45GV. However, when I executed the "Autorun" program of the support CD, I couldn't find the C-Media audio driver item in the menu. What should I do?(3/21/2005) Answer: Due to the wrong description of "AUTORUN" program of support CD for P4i45GV, you will not see "C-Media audio driver and application" item on "AUTORUN" menu under Windows XP. Although you cannot see the item, you still can install audio driver by clicking the "Serial ATA Driver" item. The wrong versions of support CD are II33c and II33d. Please refer the following picture to install the driver from support CD.
Please click "Serial ATA Driver" item to install C-Media audio diver.
Question: I used Prescott CPU and P4i45GV/P4i65GV. I wanted to use NT4.0, but the installation can not be completed. What should I do?(12/15/2004) Answer: For Prescott CPU, some OSes (ex.NT4.0) can not be installed. In order to boot legacy OSes that cannot support CPUs with extended CPUID functions, please flash to the latest BIOS to enable "Max CPUID Value Limit" (Advanced => CPU Configuration)
We don't provide drivers for NT4.0. If you need drivers for NT 4.0, please refer to following websites to get them.
VGA driver for P4I45GV/P4I65GV: http://downloadcenter.intel.com/
Question: When I play some video or audio media files through my IDE optical devices (CD-ROM and DVD-ROM). I feel that the video/audio playback is not smooth. What should I do?(2/17/2004) Answer: It might be that the CDROM is transferring in PIO mode instead of DMA mode. It is highly recommended to enable the DMA function of your IDE optical devices (CD-ROM or DVD-ROM) in order to reduce the CPU loading when accessing optical discs. Please follow the bellow procedure to enable DMA mode.
In Windows 2000/XP, assuming that your IDE optical device is connected on secondary IDE channel as master drive,
Right click the "My computer" icon, select "Properties". Then, select "Hardware"----"Device Manager".
In "Device Manager", select "IDE ATA/ATAPI controllers"----double click "Secondary IDE Channel".
In "Secondary IDE Channel Properties", select "Advance Settings" and adjust the "Transfer Mode" of the CDROM (Device 0) from "PIO Only" to "DMA if available".
Click "OK".
In Windows 98SE/ME,
Right click the "My computer" icon, select "Properties". Then, select "Device Manager".
In "Device Manager", double click "CDROM". Then, double click your optical device under "CDROM".
In the new window which displays the optical device properties, select "Settings". Then, check the "DMA" box in "Options".
Question: What's the function of JL1 and JR1 jumpers on my ASRock motherboard?(5/9/2003) Answer: When you connect speakers in back panel and front panel at the same time,
1. If the jumpers JL1 and JR1 are short, both front panel and rear panel audio connectors can work.
2. If both jumper caps on JL1 and JR1 are removed, only front panel audio works.
However, it requires your front panel to support the function.
Question: Can I use the microphone if I select 6 speakers in C-Media Audio Configuration?(5/9/2003) Answer: If you select 6 speakers in C-Media Audio Configuration for 5.1 CH output, all three audio connectors (Line in, Line out and MIC) are defined as output connectors.
Microphone is an input device. So you are not able to use the microphone at this moment.
Question: How do I select "Output Type" in C-Media 3D Audio Configuration?(5/9/2003) Answer: Please select "Analog" for "Output Device" in C-Media 3D Audio Configuration.
Question: If I want to use 4/6 speakers, how do I setup 4/6-Channel audio ?(11/26/2002) Answer: STEP 1: 4 CH: Connect the front L/R channel to "Line Out", the rear L/R channel to "Line In".
6 CH: Connect the front L/R channel to "Line Out", the rear L/R channel to "Line In", and the Center/Subwoofer channel to "Mic In".
STEP 2:
After installation of C-Media Audio driver, you will find an icon "C-Media Audio configuration" on the taskbar.
STEP 3:
Click the icon, and the screen will show the current audio configuration.
Select "Output" to change your audio configuration. Select "Analog" for Output Type and choose "4 channels" / "6 channels" for your speaker configuration.